Tux rentals
Book tuxes for the whole groom’s side, collect sizes, order from the rental company, and check them out and back in.
Set up your packages
- Open Tux rentals and press Packages (managers and owners).
- Name the package, pick the rental company (or Our own stock), set the price, the damage waiver and what's in it (coat, pants, shirt, vest, tie, shoes...).
- If the groom rides free, set Groom free with to how many paid rentals it takes. Press Add package.
A rental company not in the list? Add it as a vendor under Orders & Vendors, Vendors & pricing.
When to order: give each rental company its Usual days from order to ship on its vendor page, and answer How many days before the wedding do tuxes need to be in the store? (the setup's Tux timing step, or Settings, Register, Wedding party deadlines). The wedding party page then shows each tux's order-by date. BridalIQ never guesses either one: a missing answer leaves the date blank with a note saying what to fill in. See Order-by dates.
Book the party
- On the bride's or groom's customer page, add the men to the wedding party.
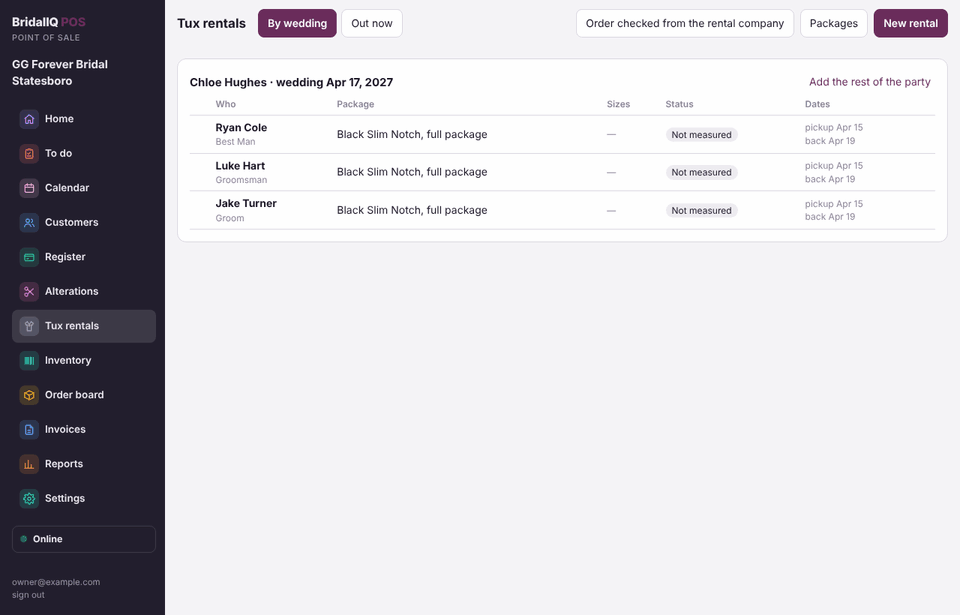
- Press Book tuxes for the groom’s side, pick the package and press Book them. Everyone on the groom's side without a rental gets one, each with its own ticket.
- For one person, press New rental on the Tux rentals screen instead. Pickup and return dates default to two days before and after his event.
Measure once
Type his measurements one time. The sizes go on his rental and on his rental ticket by themselves.
- On the wedding party (the bride's or groom's customer page), press Measure next to his name, or use Add measurements on his own page or on his rental. Each man who still needs measuring shows not measured.
- Enter chest, waist, outseam (or inseam), neck, sleeve, height and shoe size, then Save. Coat, pants, shirt, vest and shoe sizes are filled in from them: coat from the chest with the length from his height (42R), pants waist by length (34x42), shirt neck and sleeve (15.5-34), vest by chest.
- Press Create rental tickets for everyone measured on the party to book everyone measured in one go, each with his own ticket and his sizes. Anyone not measured yet is listed so you can measure him next.
Measurements on the party (or on the Tux rentals screen) shows who is measured, his sizes, and what is still missing, like Missing: Neck, Sleeve. A rental with a piece that has no size shows No size.
The sizes are a starting point: change any of them on his rental. If he is measured again, his open rentals take the new sizes (with a note on the rental), except a size you typed over, until the order goes to the rental company. After that the sizes stay as ordered and the rental gets a note to check them with the company.
Size charts: under Packages, press Size charts to set each rental company's chart (sizing the coat up, pants by outseam or inseam, coat lengths by height, vest sizes by chest). Without one, the usual chart is used.
Your own stock
Tuxes you own can be counted, so a booking checks the size is free for his dates. Packages ordered from a rental company need nothing here: they are never checked.
- Open Tux rentals and pick Stock in the left menu (managers and owners set it up).
- Press Add style, name it (Black Slim Notch coat), pick the piece (coat, pants, vest...) and how you count it:
- By size: how many of each size you have, like 42R x 6. Type the size and how many, then Add size.
- A tag on each piece: every coat, pair of pants or vest has its own tag (barcode). Scan or type the tag and its size, then Add piece; leave the tag blank and one is made for you to print.
- Press Packages, then stock next to a package from your own stock, and pick the style each piece comes from. Leave ties, studs and anything you don't count on Not checked.
Is it free? Booking and cleaning days
A rental holds its pieces from pickup through the day it is due back, plus your cleaning days (2 unless you change it on the Stock page). Due back on the 10th with 2 cleaning days, the piece can go out again on the 12th. Days are your store's days, in your store's time zone.
When the size is all taken for those days, the POS says so in plain words and what is free: the nearest sizes free for those dates (like 42L (1 left), 44R (1 left)) and the first day the size is free again. Pick another size or date, or a manager can book it anyway with a reason (a staff member gets a manager's PIN on the same screen). The OK is saved on the rental and in its history.
A tux that came back counts from the day it came back. One still out past its day stays held until it is back.
Overbooked
A change is never refused for stock: moving his dates, changing a size, marking a piece missing or damaged, or a tux coming back late. If it leaves more bookings than pieces on some day, he says Saved, but this rental is now overbooked, every rental involved shows Overbooked, and To do gets a Tux overbooked case. Give someone another size, move a date, scan another piece or add stock: the case clears as soon as it fits. A booking a manager OK'd past what was free doesn't raise it again unless something more changes.
The stock board
The Stock page shows every style. For each size: how many you have, Available, Held (booked for today, not picked up), Out, In cleaning, Missing or damaged, and how many are booked ahead. Tagged styles list each piece, where it is and who has it.
- Cleaned, ready puts a tagged piece back to Available after cleaning. Counted sizes come back by themselves after the cleaning days.
- Missing, Damaged, Found and Fixed mark a tagged piece. For counted sizes, managers change the missing and damaged numbers in the table.
Scan at pickup, back at return
- When he picks up, press Picked up. For a tagged style the POS asks you to scan the tag on each piece (a scanner types it and moves on). The exact piece is now his: it shows Out with his name. A tag held for or out with someone else on those days is refused; a piece of another size, or one still marked in cleaning, needs a manager's OK.
- When it comes back, press Returned. Each piece goes to cleaning, or mark it Damaged or Missing and add the fee as usual (taxed like the rental). Damaged or missing pieces come off what can be booked until they are fixed or found.
Sizes and ordering
- Check his sizes on his rental (they come from his measurements) and change any that need it. Save.
- Tick the rentals to order and press Order the ticked rentals from the rental company. A purchase order is made for that company; send it and receive it like any purchase order.
Pickup and return
- Take his money on his rental ticket: open it from his rental (or the Register) and use Take payment in the checkout, like any ticket. The rental, the damage waiver and sales tax are all on it.
- When he picks it up, press Picked up on his rental, or Complete rental on his paid ticket. If he still owes money, the POS offers Take payment first; a manager can still OK it going out unpaid, with a reason. The rental counts as sold that day.
- When it comes back, press Returned. Check every piece, add a late fee or a damage or missing-piece fee, and note the condition.
- The fees go on his ticket (or a new ticket if his was finished) and it opens for payment. Late and damage fees are part of the rental's price, so they are taxed at your store's rate like the rental.
Out now lists every tux that is out. Stock shows where every piece you own is.
Print the wedding party
On the bride's (or groom's) customer page, each wedding has Print wedding party. It prints one clean page with everyone in the party, their role and side, their sizes and latest measurements, and what each has ordered or rented and where it stands (ordered, received, ready, picked up). No prices are on it, so anyone can print it for the party.